Storing data in MongoDB through Node.JS
In recent years, MongoDB has become one of the most popular NoSQL databases. Its flexibility and scalability have made it a preferred choice for storing data in modern web applications. In this blog, we will learn how to store data in MongoDB using Node.js.
Before starting the blog we first get to know about MongoDB and Node.Js.
What is MongoDB?
MongoDB is a popular open-source document-oriented NoSQL database that is designed to store and manage large volumes of unstructured or semi-structured data.
What is Node.js?
Node.js is an open-source, cross-platform, JavaScript runtime environment allowing developers to run JavaScript code outside a web browser.
Creating a Node.js project
The first step is to initialize your app; you have to write the npm init command on your command prompt.
mkdir node-mongo
cd node-mongo
npm init
It will generate two files named package.json and package-lock.json, you don’t have to do anything with these files as these files are very important for the installation process.
Now, you have to install 2 dependencies:
Express: It is a popular web application framework for Node.js that simplifies the process of building robust, scalable, and secure web applications.
Mongoose: It allows developers to write MongoDB queries in JavaScript syntax and provides a layer of abstraction between the application and the database.
You can install these dependencies by writing npm i express mongoose cors body-parser on the command prompt in the same directory you are working in.
npm i express mongoose
Now, create a file named index.js and copy this code:
import express from "express";

const app = express();
const PORT = 8000;

app.listen(PORT, () => {
  console.log(`The server is running at port ${PORT}`);
});
Connecting to database
To connect the MongoDB to your node.js environment you need to create a folder here I am naming it by database, under this folder you need to create the file db.js.
import mongoose from "mongoose";

const Connection = async () => {
  mongoose.set("strictQuery", false);

  const URL = `mongodb://localhost:27017/{YOUR_DATABASE_NAME}`
  try {
    await mongoose.connect(URL, {
      useUnifiedTopology: true,
      useNewUrlParser: true,
    });
    console.log("Database connected");
  } catch (error) {
    console.log("you got this ", error);
  }
};
export default Connection;
Now, you need to update your index.js like this:
import express from "express";
import Connection from "./database/db.js";
import Routes from "./routes/route.js";


const app = express();
const PORT = 8000;

app.use("/", Routes);

Connection();
app.listen(PORT, () => {
     console.log(`server is running at port ${PORT}`);
});
To check if you are connected to the database, write the npm start command on the command prompt. If it shows this output on the command prompt screen:
The server is running at port 8000
Database connected
Then it clearly shows that you successfully established the connection between your node.js environment and MongoDB.
In case of any error encounters, just go through the steps again.
Creating Schema
Now, our next step is to create the schema of the collection(The collection is the equivalent of a table in a relational database).
Create a folder named schema under this folder and create a file named Schema.js.
import mongoose from "mongoose";


const userSchema = mongoose.Schema({
      name: String,
      username: String,
      email: String,
      phone: String,
});
const user = mongoose.model("user", userSchema);
export default user;
Creating APIs
Now, the next step is to create APIs in order to store data in Mongodb through Nodejs.
Create a folder named routes inside this folder create a file named route.js. In this file, you are going to define the APIs that we will be using to store data.
import express from "express";
import User from "../schema/user-schema.js";


const router = express.Router();

router.post("/add", async (req, res) => {
  const user = req.body;
  const newUser = new User(user);
  try {
    await newUser.save();
    res.status(201).json(newUser);
  } catch {
    res.status(409).json({ message: error.message });
  }
});
router.get("/all", async (req, res) => {
  try {
    const users = await User.find({});
    res.status(200).json(users);
  } catch (error) {
    res.status(404).json({ message: error.message });
  }
});
router.put("/:id", async (req, res) => {
  let user = req.body;
  const editUser = new User(user);
  try {
    await User.updateOne({ _id: req.params.id }, editUser);
    res.status(201).json(editUser);
  } catch (error) {
    res.status(409).json({ message: error.message });
  }
});
router.delete("/:id",  async (req, res) => {
  try {
    await User.deleteOne({ _id: req.params.id });
    res.status(200).json({ message: "User deleted Successfully" });
  } catch (error) {
    console.log(error);
  }
});
Testing APIs
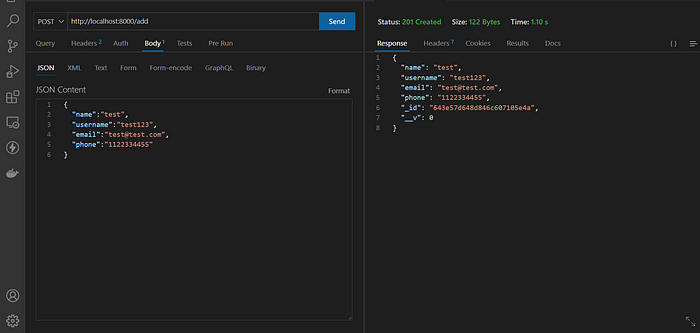
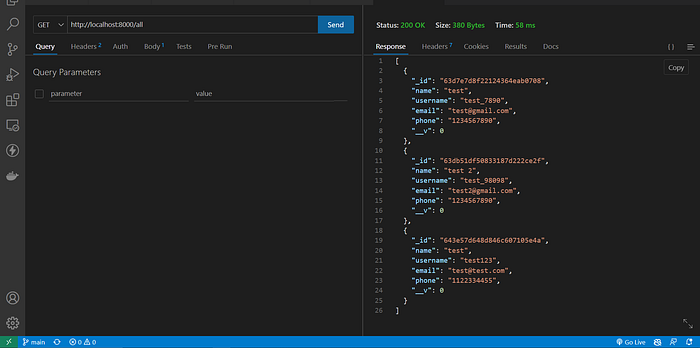
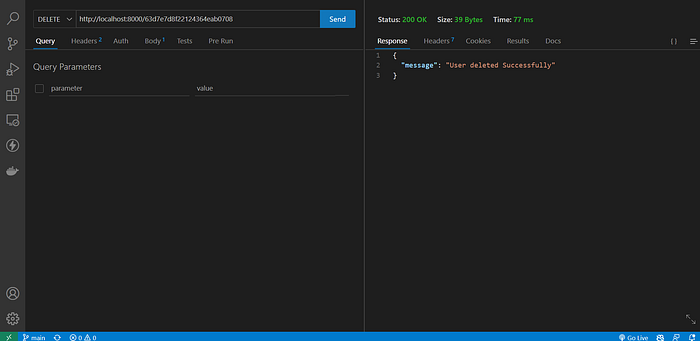
For this blog, I’ll be using Thunder client for testing the API as it is easy to install and easy to execute the APIs. You just need to install its extension on the Visual Studio code.
This is how you can test your API on the Thunder client:
- Post

- Get

- Delete

Conclusion
In this blog, we learned how to perform CRUD operations in MongoDB with the help of RESTful API created using Nodejs. With this knowledge, you should be able to build more complex applications using MongoDB as your data store.