Step-by-Step Guide to Implementing Authentication in Nodejs and MongoDB with JWT and Cookies


Authentication is a critical aspect of web development, ensuring that only authorized users gain access to protected resources. In this blog, we will delve into the world of authentication in Node.js and storing the user’s credentials on MongoDB, focusing on the powerful combination of JWT(JSON web token) and cookies. By the end of this blog, you’ll have a solid understanding of how to implement secure user authentication in your Full-stack applications.
What is Authentication?
Authentication is the process of verifying the identity of a user, system, or entity. The primary goal of authentication is to ensure that the entity trying to access a system or resource is who it claims to be.
How is it different from authorization?
Authorization is the process of granting or denying access to specific resources or actions based on the authenticated user’s privileges. The main goal of authorization is to define what actions or resources a user is allowed to access after their identity has been confirmed through authentication.
What is JWT(JSON Web Tokens)?
It is a compact, URL-safe means of representing claims between two parties. The claims in a JWT are typically used to authenticate a user and provide additional information about them. JWTs are commonly used for authentication and information exchange in web development.
Key Advantages of JWT:
Stateless: JWTs are stateless, meaning the server doesn’t need to keep track of the user’s session. This is particularly advantageous for scalability.
Compact and Efficient: JWTs are compact and can be easily transmitted over the network, making them ideal for use in web applications.
Token-Based Authentication: JWTs are commonly used for token-based authentication, eliminating the need for continuous database queries during each request.
Versatility: JWTs can carry custom claims and information, providing developers with flexibility in designing authentication and authorization systems.
Security: JWTs can be signed to ensure the integrity of the token. They can also be encrypted to protect sensitive information within the token.
Setting up a Node.js project
Initialize a New Node.js Project
Open your terminal or command prompt and navigate to the directory where you want to create your Node.js project.
Run the following command to initialize a new Node.js project:
mkdir user-authentication
cd user-authentication
npm init -y
Install Necessary Packages
For this project you’ll need to install these packages:
Express: It is a popular web application framework for Node.js that simplifies the process of building robust, scalable, and secure web applications.
jsonwebtoken: A library for generating and verifying JSON Web Tokens (JWT).
cookie-parser: A middleware for parsing cookies
Bcrypt: A library for hashing password
Mongoose: It allows developers to write MongoDB queries in JavaScript syntax and provides a layer of abstraction between the application and the database.
cors: It is used to enable secure cross-origin data transfers between a client (usually a web browser) and a server, particularly when the client and server are hosted on different domains.
body-parser: It helps to parse the incoming data that is being sent by the API call
To install these packages run the following command:
npm install express jsonwebtoken cookie-parser bcrypt cors body-parser dotenv
Create Project Files
Now, create an index.js file inside the working directory and copy or write this code (I prefer to write the code if you’re a beginner):
const express = require("express");
const app = express();

const PORT = 8000;
app.listen(PORT, () => {
  console.log(`Server is running on PORT ${PORT}`);
});
Run this code by using the node index.js command if it is showing this:
Server is running on PORT 8000
then you have done the first step. If you somehow get the error then do this again.
Setting up MongoDB
Connecting to Database
To connect the MongoDB to your node.js environment you need to create a folder I am naming it by database, under this folder you need to create the file db.js.
const mongoose = require("mongoose");
const env = require("dotenv");

env.config();
const dbconnection = async () => {
  mongoose
    .connect(process.env.MONGODB_URL)
    .then(() => console.log("Database connected"))
    .catch((err) => console.error(err));
};
module.exports = dbconnection;
Now, you need to update the index.js file
const express= require("express");
const Connection=require("./database/db");

const app=express();

const PORT=8000;

Connection();

app.listen(PORT, () => {
     console.log(`server is running at port ${PORT}`);
});
To check if you are connected to the database, write the npm start command on the command prompt. If it shows this output on the command prompt screen:
The server is running at port 8000
Database connected
Then it clearly shows that you successfully established the connection between your node.js environment and MongoDB.
In case of any error encounters, just go through the steps again.
Building User Schema
Now, our next step is to create the schema of the collection(The collection is the equivalent of a table in a relational database).
Create a folder named schema under this folder and create a file named Schema.js.
const mongoose=require("mongoose");

const userSchema=mongoose.Schema({
      name:String,
      username:String,
      email:String,
      password:String,
})
const user=mongoose.model("user",userSchema);
module.exports=user;
Building Authentication
Token Generation
Before we build the user registration we first need to generate the token for the authentication.
Create a folder named tokenGeneration(you can name anything) under that create a file named generateToken.js.
Write or copy the code given :
require("dotenv").config();
const jwt = require("jsonwebtoken");

module.exports.createSecretToken = (id) => {
  return jwt.sign({ id }, process.env.TOKEN_KEY, {
    expiresIn: 3 * 24 * 60 * 60,
  });
};
User Registration
Now our next step is to create a function to create or register the user in our platform.
We need to create the folder named controller under which we will be creating a new file named signup.js.
Write or copy this code to create the signup.js
const User = require("../database/model/user");

const { createSecretToken } = require("../tokenGeneration/generateToken");
const bcrypt = require("bcrypt");

const createUser = async (req, res) => {
  try {
    if (
      !(
        req.body.email &&
        req.body.password &&
        req.body.name &&
        req.body.username
      )
    ) {
      res.status(400).send("All input is required");
    }

    const oldUser = await User.findOne({ email: req.body.email });

    if (oldUser) {
      return res.status(409).send("User Already Exist. Please Login");
    }
    const salt = 10;
    const hashedPassword = await bcrypt.hash(req.body.password, salt);
    const newUser = new User({
      name: req.body.name,

      username: req.body.username,
      email: req.body.email,
      password: hashedPassword,
    });
    const user = await newUser.save();
    const token = createSecretToken(user._id);

    res.cookie("token", token, {
      path: "/", // Cookie is accessible from all paths
      expires: new Date(Date.now() + 86400000), // Cookie expires in 1 day
      secure: true, // Cookie will only be sent over HTTPS
      httpOnly: true, // Cookie cannot be accessed via client-side scripts
      sameSite: "None",
    });

    console.log("cookie set succesfully");

    res.json(user);
  } catch (error) {
    console.log("Gott an error", error);
  }
};
module.exports = createUser;
User login
Now our next step is to create a function to log in and verify the user in our platform.
We need to create the folder named controller under which we will be creating a new file named login.js.
Write or copy this code to create the login.js
const User = require("../database/model/user");
const bcrypt = require("bcrypt");

const env = require("dotenv");
const { createSecretToken } = require("../tokenGeneration/generateToken");

env.config();

const login = async (req, res) => {
  const { email, password } = req.body;
  if (!(email && password)) {
    return res.status(400).json({ message: "All input is required" });
  }
  const user = await User.findOne({ email });
  if (!(user && (await bcrypt.compare(password, user.password)))) {
    return res.status(404).json({ message: "Invalid credentials" });
  }
  const token = createSecretToken(user._id);
  res.cookie("token", token, {
    domain: process.env.frontend_url, // Set your domain here
    path: "/", // Cookie is accessible from all paths
    expires: new Date(Date.now() + 86400000), // Cookie expires in 1 day
    secure: true, // Cookie will only be sent over HTTPS
    httpOnly: true, // Cookie cannot be accessed via client-side scripts
    sameSite: "None",
  });

  res.json({ token });
};
module.exports = login;
Creating routes
Now create a folder named route under which we need to create a file named route.js.
This is the code, you can write or copy the code:
const express = require("express");

const login = require("../controller/login");
const createUser = require("../controller/Signup");

const router = express.Router();

router.post("/signup", createUser);
router.post("/login", login);
router.get("/logout", (req, res) => {
  res.clearCookie("token");
  res.json({ message: "Logged out" });
});
module.exports = router;
Connecting these routes to the main file
Now, to make these routes work we need to update the main file which is index.js like this:
const express = require("express");
const app = express();
const Connection = require("./database/Connection");
const PORT = 8000;
const authRoute = require("./routes/route");
Connection();
app.use("/api", authRoute); // Updated part
app.listen(PORT, () => {
  console.log(`Server is running on PORT ${PORT}`);
});
Errors in our code
There are three main errors in our code:
Body-parser error: We did not add the body-parser to our code which will cause the error in which our code is not able to parse the JSON body data while calling the API.
Cookie-parser error: It is the same as the body-parser error but the difference is instead of JSON, it will not parse the cookie which we are sending while calling the API.
CORS error: I know you have encountered this error many times and you fix this error by adding cors middleware but when we are dealing with the cookies we need to make some small changes in a code.
Now, to solve these errors you need to update the index.js file like this:
const express = require("express");
const app = express();
const Connection = require("./database/Connection");
const PORT = 8000;
const authRoute = require("./routes/route");
Connection();
// updatd code
app.use(bodyParser.json({ extended: true }));
app.use(bodyParser.urlencoded({ extended: true }));
app.use(cookieParser());

app.use((req, res, next) => {
  // Set CORS headers
  res.header("Access-Control-Allow-Origin", process.env.FRONTEND_URL); // Replace with your frontend domain
  res.header("Access-Control-Allow-Methods", "GET, POST, PUT, DELETE");
  res.header("Access-Control-Allow-Headers", "Content-Type, Authorization");
  res.header("Access-Control-Allow-Credentials", "true"); // Allow credentials (cookies, etc.)

  // Pass to next layer of middleware
  next();
});
app.use("/api", authRoute);
app.listen(PORT, () => {
  console.log(`Server is running on PORT ${PORT}`);
});
Now, in this project, we have used various credentials that we don't want to reveal to the public. You might have noticed in the code that I have written something like process.env.VARIABLE_NAME. This is known as setting an environment variable. It's easy to create – just make a file named .env and declare the variables you want to keep private. Also, you'll need to install a package called dotenv by typing this:
npm i dotenv
Here is an example of .env file
TOKEN_KEY=abc@123
FRONTEND_URL=http://localhost:3000
MONGODB_URL=mongodb://localhost:27017/{YOUR_DATABASE_NAME}
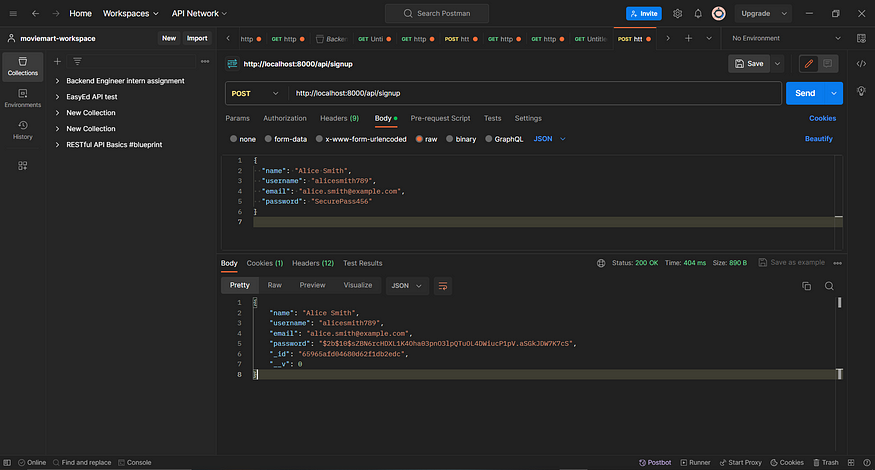
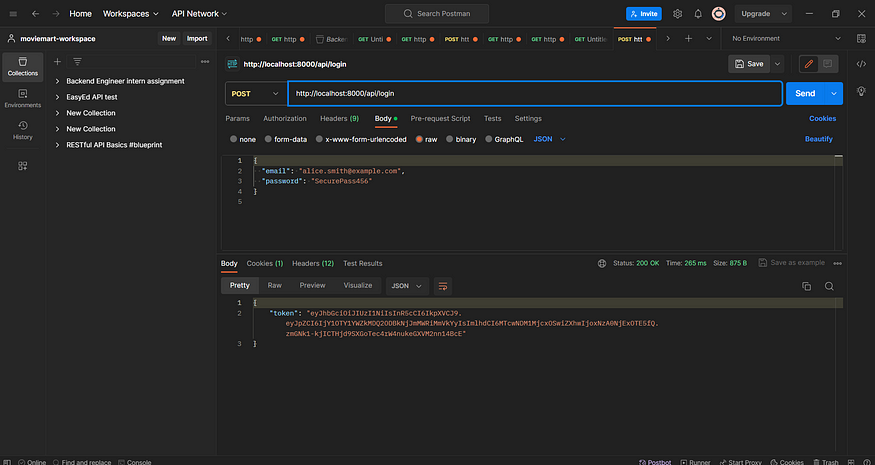
Testing the APIs
Here are the screenshots of the API test
Signup
Login
Logout

Conclusion
In conclusion, this blog has offered a detailed guide on setting up authentication in Node.js and MongoDB using JWT and cookies. With this information, developers can build secure, scalable, and user-friendly full-stack applications confidently.